WISP Coova phpMyPrepaid
Introduction
This section contains documentation on work done regarding testing of an implementation that would make it as easy as possible for a would-be entrepreneur to deploy an ISP service over a wireless network infrastructure. The entrepreneur should be able to manage, monitor and charge users with ease.
Setup Ingredients
The tools used to setup this testbed:
- Coova WISP-in-a-box Wireless Africa wiki, URL
- phpMyPrepaid Wireless Africa wiki, URL
- FreeRADIUS
- MySQL
- Ubuntu Hardy Server - This is the distro that was used for the gateway server. In future, it is intended to have this setup (when finalized) integrated into Inveneo Hub Server Linux.
Setup Recipe

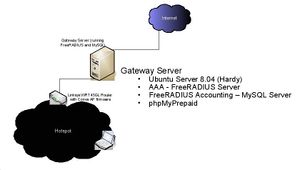
At the moment the intention of this setup is to mainly test billing support, and is more of a wifi-hotspot setup. It will later on be modified to adapt to a wireless mesh network environment. The gateway server has an external network interface (e.g, eth0) that is connected to the Internet, and an internal network interface (e.g, eth3), connected to the Coova Linksys Router (internal network). In this case the external network interface gets its IP address automatically (DHCP). The internal network interface is assigned a static ip address (e.g, 192.168.5.1), therefore the Coova WAN interface is also set to static (e.g, 192.168.5.4). All instructions below are provided with the assumption that this is a fresh install of Ubuntu. Performing these steps on an existing installation does not guarantee proper functionality.
Coova
- Setup coova to act as a Chillispot-type hotspot, with auto-configuration disabled. (Setup may be tested later on with WifiDog instead of Chillispot).
- Fill in UAM Hostname, UAM Secret, NAS Identifer information.
- Fill in RADIUS server details and secret. (To be inserted into FreeRADIUS configuration on Gateway server.)
Gateway server
- Install Ubuntu Server (Hardy), with minimum MySQL, FreeRADIUS, Apache webserver. DO NOT Install the DNS Server. This is because I have decided to use dnsmasq instead, as I found it much easier to setup for any user who is not familiar with bind9. Bind9 is the default DNS server that is included with Ubuntu distributions.
- Install Webmin. Webmin is a great tool with a web-based frontend to administer many important settings under Linux (Startup/Shutdown Scripts, DNS, DHCP, Firewall, NAT; also supports plugins for other tools). (an apparently better alternative is ispconfig, but I've not tested this tool yet.)
- Setup up network configuration for both network interfaces. [Todo: Should check out the dnsmasq webmin module..]
- Configure NAT using iptables (can be done using the Webmin interface.).
- Click on Networking -> Linux Firewall on the left panel of the Webmin interface.
- On the Linux Firewall page, at the top left, there is a list box next to the Showing IPtable: button. Click on this list box and ensure Network address translation (nat) is selected.
- Click on Showing IPtable: The page will reload with NAT iptable configuration.
- Under the section Packets after routing (POSTROUTING), click on the Add Rule button. The page reloads with the Add Rule page.
- In the Chain and action details section, you may fill the Rule comment section with a description of your choice (e.g., Internet access for intranet). Choose Masquerade option in the Action to take field. Leave other fields as is.
- In the Condition details, select outgoing interface to the external interface (eth0 for the purpose of this document.) Leave other details as is.
- Click 'the 'Create button.
- This page will reload the general Linux Firewall page. You should see a rule under the postrouting section to the following effect:
Action: Masquerade; Condition:If output interface is eth0
- Configure NAT using iptables (can be done using the Webmin interface.).
More to follow within the next few days.