NEW: Quick getting started guide for setting up an outdoor mesh node: Difference between revisions
No edit summary |
|||
| Line 2: | Line 2: | ||
To download a larger clearer version of this image click [[Media:Mesh install-large.jpg|here]] | To download a larger clearer version of this image click [[Media:Mesh install-large.jpg|here]] | ||
== Step by step guide to getting onto Pretoria network == | |||
NEW! | |||
The first edition of "Wireless Networking in the Deveolping World" is available as e-book now. Prints can be | |||
ordered on demand at lulu.com. The e-book is available at no cost under a creative commons license. | |||
Get your copy at [http://wndw.net/ wndw] or [[Media:Wndw-ebook.pdf|locally]] and share it. | |||
==Step 1. Check where you are on the planet:== | |||
Your very first step is to find your current position on a map and then see what other wireless nodes are nearby. The best way to do this is to get a GPS and find out your coordinates and then to enter these into [http://earth.google.com/ google earth] - you can also use google earth to find your coordinates by identifying your house on the satellite image. | |||
==Step 2. Check who else is around that you can connect to == | |||
Once you have entered your google earth position - have a look at the positions of other wifi installations around you. For the [[Pretoria Mesh]] we have stored all the google earth positions in this [ftp://ftp.icomtek.csir.co.za/pub/in/wiki/wifi%20installations.kmz file]. You can also have a look on sites like [http://http://www.nodedb.com/ NodeDB] to see if there are other wireless installations near you. Once you have identified someone that you want to connect to, the best way to check connectivity is to use a WiFi sniffer such as [http://www.netstumbler.com/ netsumbler] for windows or [http://www.kismetwireless.net/ Kismet] on linux loaded on a laptop with a Wifi card fitted with an external antenna. Find the highest point at your house such as your roof and slowly rotate the directional antenna around you to see if you can pick up any WiFi access points. You will want to find an access point that is in ad-hoc mode and is mesh enabled - the wifi sniffer will tell you if the wireless node is in ad-hoc mode but you will have to contact the owner to check what mesh protocol, if any, they are running. | |||
For the Pretoria network you will be looking for any node with the SSID: ptamesh | |||
==Step 3. Build a mesh node== | |||
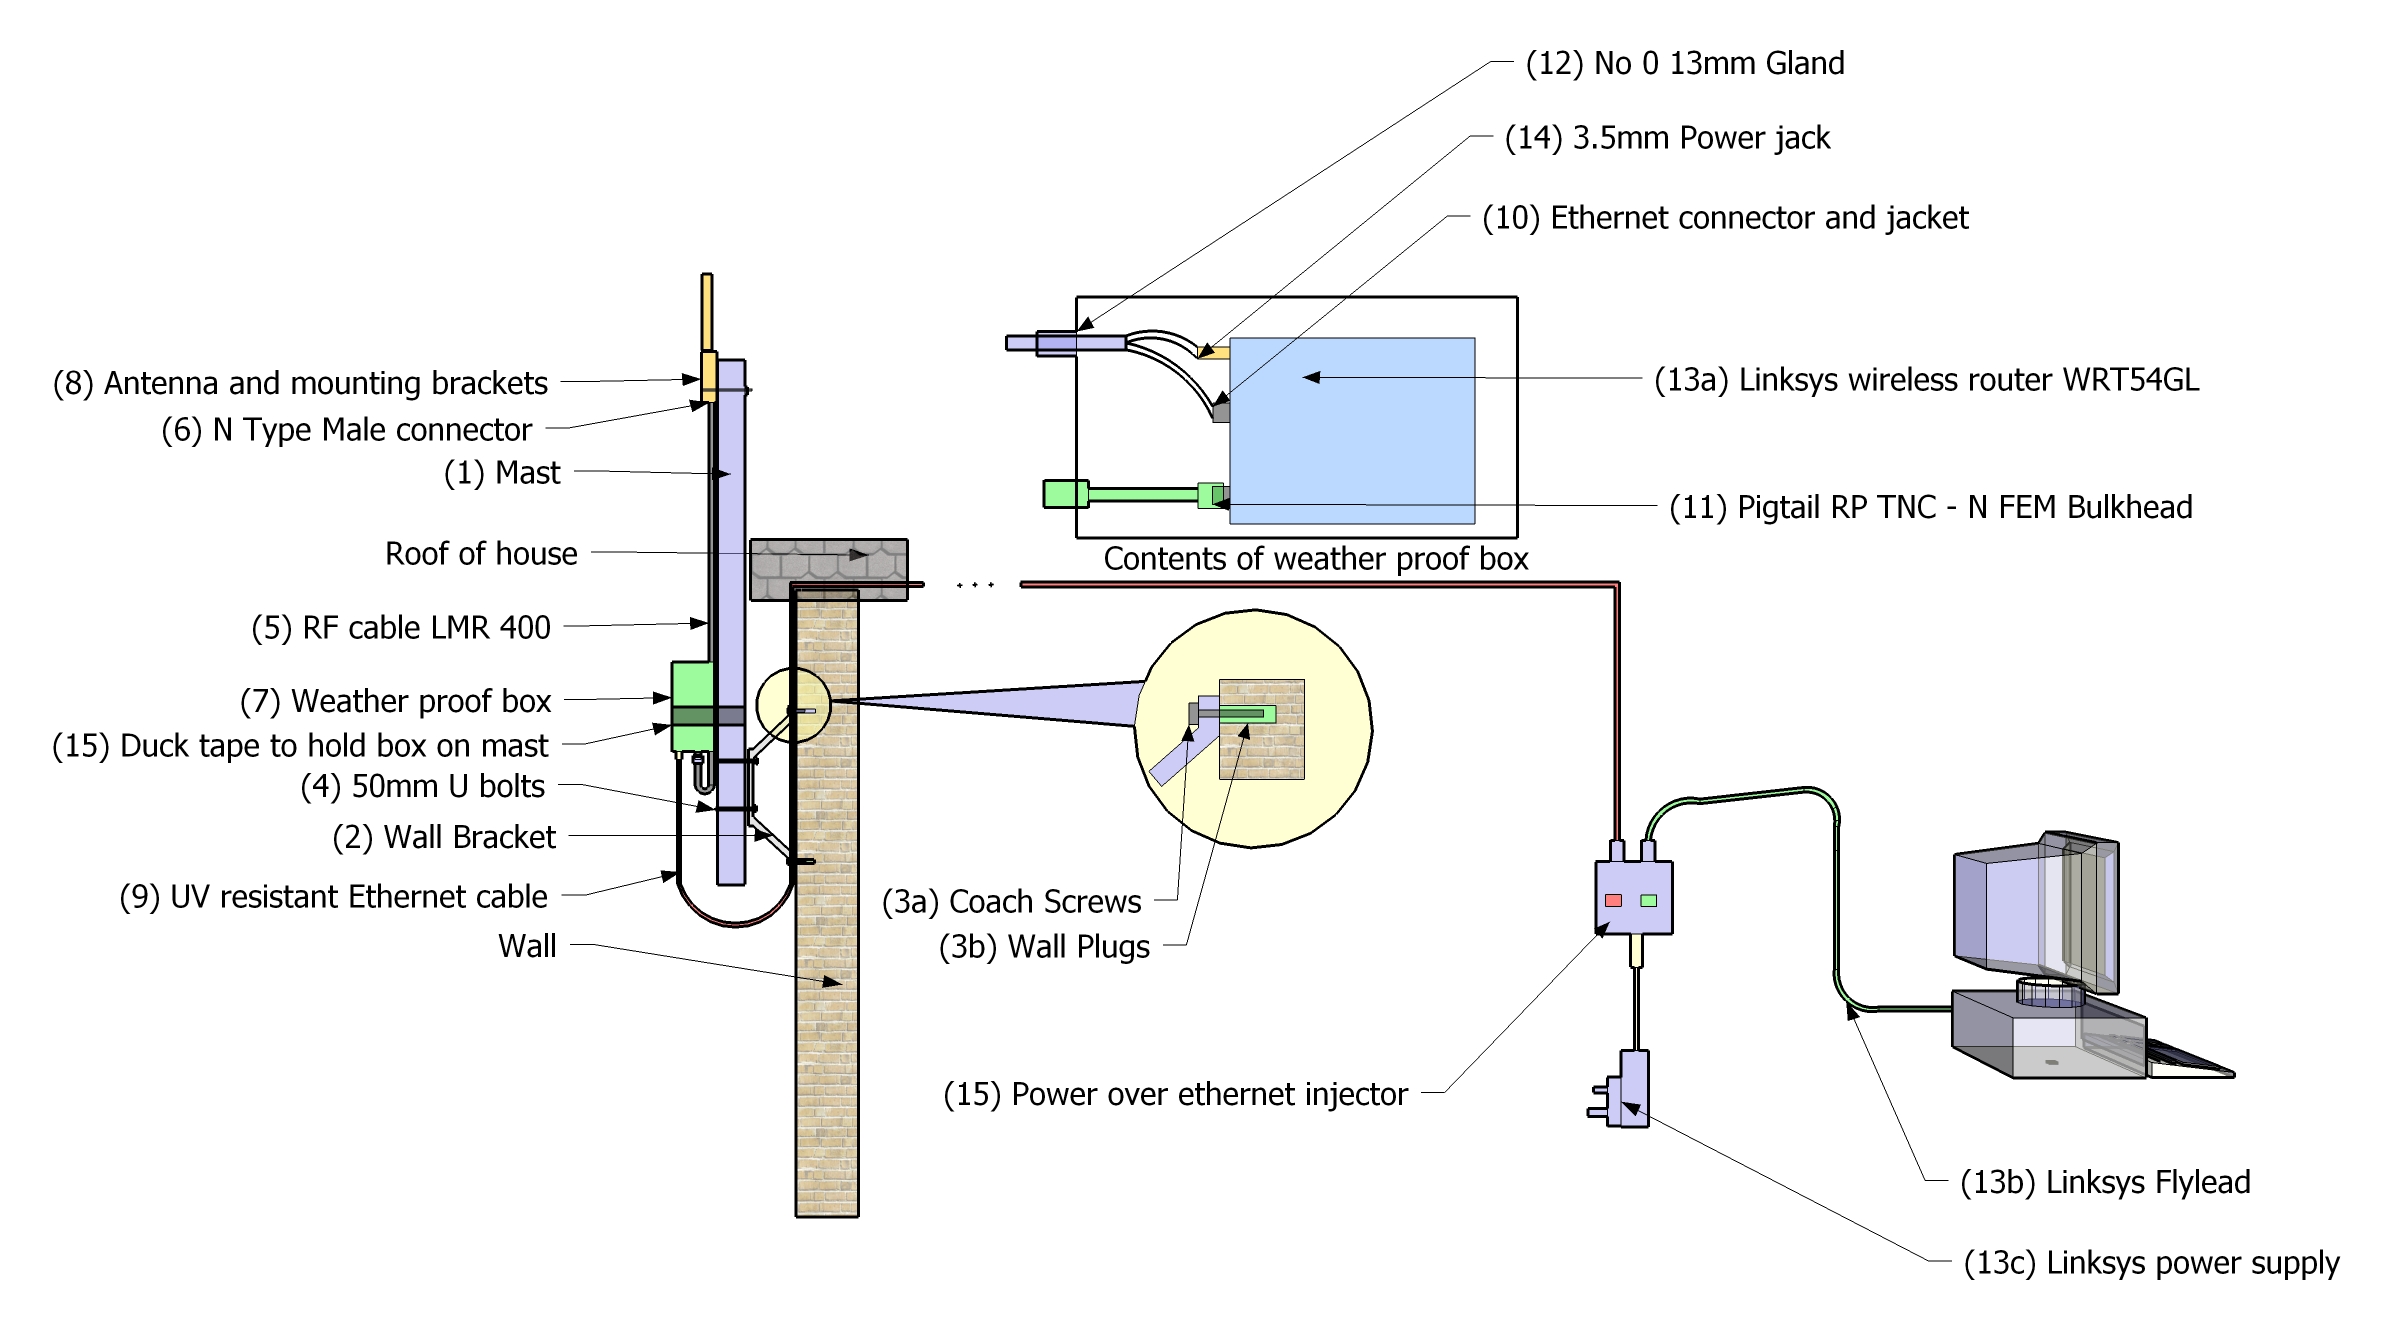
Now that you know where you are located and you have hopefully found someone you can connect to, you will need to construct your mesh hardware. Have a look at the diagram at the top of the wiki for a description of all the components that make up an installation. Below is a shopping list of all the components together with the suppliers that provide them and prices. | |||
== Shopping list == | == Shopping list == | ||
| Line 61: | Line 83: | ||
| || || || || || || '''GRAND TOTAL''' || '''R1599.94''' | | || || || || || || '''GRAND TOTAL''' || '''R1599.94''' | ||
|} | |} | ||
== Tools and accessories needed == | == Tools and accessories needed == | ||
Revision as of 16:40, 14 June 2006

To download a larger clearer version of this image click here
Step by step guide to getting onto Pretoria network
NEW!
The first edition of "Wireless Networking in the Deveolping World" is available as e-book now. Prints can be
ordered on demand at lulu.com. The e-book is available at no cost under a creative commons license.
Get your copy at wndw or locally and share it.
Step 1. Check where you are on the planet:
Your very first step is to find your current position on a map and then see what other wireless nodes are nearby. The best way to do this is to get a GPS and find out your coordinates and then to enter these into google earth - you can also use google earth to find your coordinates by identifying your house on the satellite image.
Step 2. Check who else is around that you can connect to
Once you have entered your google earth position - have a look at the positions of other wifi installations around you. For the Pretoria Mesh we have stored all the google earth positions in this file. You can also have a look on sites like NodeDB to see if there are other wireless installations near you. Once you have identified someone that you want to connect to, the best way to check connectivity is to use a WiFi sniffer such as netsumbler for windows or Kismet on linux loaded on a laptop with a Wifi card fitted with an external antenna. Find the highest point at your house such as your roof and slowly rotate the directional antenna around you to see if you can pick up any WiFi access points. You will want to find an access point that is in ad-hoc mode and is mesh enabled - the wifi sniffer will tell you if the wireless node is in ad-hoc mode but you will have to contact the owner to check what mesh protocol, if any, they are running.
For the Pretoria network you will be looking for any node with the SSID: ptamesh
Step 3. Build a mesh node
Now that you know where you are located and you have hopefully found someone you can connect to, you will need to construct your mesh hardware. Have a look at the diagram at the top of the wiki for a description of all the components that make up an installation. Below is a shopping list of all the components together with the suppliers that provide them and prices.
Shopping list
| × | Item description | Supplier | Supplier Stock Code | Quantity type | Cost | Quantity | Total |
|---|---|---|---|---|---|---|---|
| 1 | 1.5m 38mm Aluminium mast | MIRO | AP-38x150 | EACH | R40.00 | 1 | R40.00 |
| 2 | Wall Bracket - Large - 250mm (tripod) | MIRO | WB-250-15 | EACH | R45.00 | 1 | R45.00 |
| 3 | Coach screw with wall plug | MIRO | COACH | EACH | R2.00 | 3 | R6.00 |
| 4 | 50mm U Bolt (Mast to Wall Bracket) | MIRO | UB-50 | EACH | R3.50 | 2 | R7.00 |
| 5 | LMR400 Cable (per Meter) - Loss 0.2dB /m | MIRO | LMR195 | METERS | R20.00 | 3 | R60.00 |
| 6 | N-Type (Male) Connector for LMR400 Cable | MIRO | N(m)-400xxx | EACH | R50.00 | 2 | R100.00 |
| 7 | Weather Proof Box | ROSS | xxx | EACH | R90 | 1 | R70.00 |
| 8 | 12dBi Yagi Antenna - 2.4GHz | MIRO | PA-12-YAGE | EACH | R240 | 1 | R240.00 |
| 9 | UV Resistant Ethernet cable /m | Compucable | xxx | METERS | R2.50 | 20 | R50.00 |
| 10 | Ethernet connector and jacket | Compucable | xxx | EACH | R1.48 | 2 | R2.96 |
| 11 | Pigtail RP TNC - N FEM Bulkhead | WEBB | xxx | EACH | R160.00 | 1 | R160.00 |
| 12 | No 0 13mm Gland | ROSS | xxx | EACH | R15.00 | 1 | R15.00 |
| 13 | Linksys WRT54GL | MIRO | LS-WRT54GL | EACH | R515.00 | 1 | R515.00 |
| 14 | 3.5mm Power Jack | ROSS | xxx | EACH | R2.50 | 1 | R2.50 |
| 15 | Power over Ethernet Injector (CAT5) - Base - no PSU | MIRO | 12V-POE | EACH | R90.00 | 1 | R90.00 |
| TOTAL | R1403.46 | ||||||
| VAT | R196.48 | ||||||
| GRAND TOTAL | R1599.94 |
Tools and accessories needed
| × | Item description | Purpose |
|---|---|---|
| 1 | GPS | Establish coordinates of site |
| 2 | Signal measurement device | Measure signal strength to establish Antenna gain required |
| 3 | >650W Drill | For Drilling holes to mount wall bracket |
| 4 | 11mm Masonary drill bit | For Drilling holes to mount wall bracket |
| 5 | Duck tape | To secure box on mast |
| 6 | Ethernet crimping tool | To build custom ethernet cable length from box to PC in house |
| 7 | Size 10 Spanner | For Antenna bracket nuts and U bolt nuts |
| 8 | Size 13 Spanner | For Coach screws |
| 9 | Flat Screwdriver | To open waterproof enclosure |
| 10 | HT Tape | To seal RF connectors at Box and antenna |
| 11 | Ladder | Best to use this instead of pole vaulting onto roof |
| 12 | 13mm Hole sore | To drill 13mm hole for N-Type Bulk head and gland for ethernet |